2026-09-28
Running NakeyJakey's New Vegas on Linux
An end-to-end guide to getting NakeyJakey's curated, modded Fallout New Vegas experience running on a Linux machine, using Proton, protontricks, and Jackify.
To me, 'Fallout: New Vegas' has always been one of those pervasive-in-the-internet-deep-gaming-lore titles, which never fails to show up on lists of the most influential games of all time, and which is still deeply loved by the community years after its release, all of its flaws and imperfections included. As such, it has been on my radar for years, but without there ever being that final push to go pick it up, and start exploring its legendary universe and story.
So naturally, when NakeyJakey in a video on his second channel a few months ago, casually entertained the idea of making a video of his mod list for New Vegas, I was intrigued. An excuse to pick up this cult classic, with all of the infamous Bethesda roughness polished out via a catered mod list from Naked Jacob himself? I strapped in for a wait of unknown length, which ended yesterday, where we got a double video drop from the nr. 1 videogame-essayist-on-an-exercise-ball creator on the internet. A classic NakeyJakey video essay on mods on the main channel (How Mods Changed Video Games Forever), and the install guide and overview of NakeyJakey's New Vegas, a curated New Vegas experience from the man himself, featuring multiple mods made by him and his brother.
But: The guide is 100% for Windows. Boo. If gamers truly are the most oppressed demographic, then I don't know where that leaves gamers on Linux.
Anywhomst, videogame mods are one of many examples of the beauty of open source software, and I had no doubt that there had to be a way to get this New Vegas experience I had been waiting patiently for, running on my Linux machine. And that's what this quick blog post is going to be: an end-to-end guide to getting NakeyJakey's New Vegas running on a Linux machine.
For reference, here's the official guide from Jakey: NakeyJakey's New Vegas Installation Guide
Table of Contents
- A Disclaimer of Sorts
- My Setup
- Phase 1: Getting Set Up
- Phase 2: Modding the game
- Phase 3: Launching NakeyJakey's New Vegas
- Conclusion
A Disclaimer of Sorts
This guide will contain a fair few terminal commands, ready for you to blindly copy, paste, and execute if you feel so inclined. Please make sure to read and understand any commands that you plan to run on your machine, so you know what has been modified in case something goes wrong. I'll also be referring to some download links along the way, which you should make sure to verify against the official guide from NakeyJakey. I've lifted them straight from there, but nonetheless, stuff moves, and I might not manage to keep everything in sync.
My Setup
This guide should work for most Linux setups that Steam can run on, but just for good measure, I should mention that I got this running on a dilapidated Dell Precision 5530, running Arch Linux on Linux kernel 7.2.7-arch1-1. I have 16 humble gigabytes of RAM available, a 4 GB swap, and a decidedly not-meant-for-gaming graphics card in the form of an NVIDIA Quadro P1000 Mobile. Supporting that, I have an integrated Intel UHD Graphics 630 card. I'm on an Intel i7-8850H processor.
Phase 1: Getting Set Up
First things first, this setup has a fair few prerequisite files, tools, and configurations that we need to get sorted, before we can start applying the mods.
Step 0: Tools and environment
To get through this guide, you'll of course need to have Steam running on your machine, along with some of the Proton tooling developed by Valve. Most of it should already be available and manageable through Steam, but you will need to explicitly install protontricks, 7zip, and fuse2. I also add wget to the list, and the future command references will assume that wget is available on the machine - feel free to swap for curl -LO.
On Arch you'll need to do this through pacman, but they should be available through all of the common Linux package managers.
On Arch, just run:
sudo pacman -Syu protontricks fuse2 7zip wget
As any Linux user will know, your mileage will vary in terms of maybe needing additional libraries - just install them as they turn out to be absent.
Unless you happen to have it installed already, you'll also need a 32-bit version of Vulkan, matching your target GPU. In my case, that required some AUR downloads of old NVIDIA drivers - tread carefully here, and always check what you're installing, and from who, when leveraging AUR (or your distribution equivalent).
Step 0.1: Make your peace with NVIDIA on Linux
As it turns out, I have been happily living without my actually dedicated NVIDIA GPU for a good while, luckily being kept afloat by my integrated Intel GPU. NVIDIA-on-Linux is an infamous nightmare, and I highly encourage that you check up on the health and state of your driver setup ahead of time - there's not really any generally applicable guide to that, but try taking nvidia-smi for a spin, to see if your driver and GPU are playing ball.
Step 1: Get the game
Needless to say, you'll need Fallout: New Vegas bought through Steam, with all of its DLC - so the Ultimate Edition. You'll need around 79GB of available disk space for the game, all the DLC, and the mods.
Step 2: Launch the game
When launching the game, make certain that Steam launches it using the Proton Experimental launch configuration. You do so by, in the game page in your Steam library, clicking the settings icon (little gear icon), and choosing Properties…. In the properties menu, you then have to switch to the Compatibility tab, check the Force the use of a specific Steam Play compatibility tool box, and in the now visible dropdown, choose Proton Experimental.
Now on to launching the game - but only briefly! We just need the game to launch to generate the .ini files that we need in the later steps, to launch the game with the mods. So just press the big ol' PLAY button, and wait a second while Proton works its magic.
This initial launch may take several minutes, but as long as the Steam output logs show it installing DLLs, things are moving according to plan. Eventually, you should get a popup in the Steam GUI, mentioning that it is processing the Vulkan shaders. Wait that one out as well, which might take an unbearably long time if you're on as weak hardware as me. At last, enjoy the splash screen that you've just waited a potentially very long time for, and close the game again. This should have generated everything we need, and we can now proceed to the modding portion of the process.
Note: If at any point you run into issues launching the game, you can enable Proton logs in your Steam configuration: in the same
Properties…menu, you can inputPROTON_LOG=1 %command%under the "Launch Options" menu item, which will be in the "General" tab of the properties. This will make Proton output more in-depth logs, which you can use to debug any issues - that's how I found out about me missing the 32-bit Vulkan drivers needed to launch the game. Just remember to remove the config again when debugging is done, since the logs accumulate pretty aggressively.
Note: Depending on how convoluted your NVIDIA on Linux setup is, you might benefit from forcing the usage of the NVIDIA card while launching, by setting the Launch Config to:
__NV_PRIME_RENDER_OFFLOAD=1 __GLX_VENDOR_LIBRARY_NAME=nvidia __VK_LAYER_NV_optimus=NVIDIA_only %command%- this gave me a much needed performance boost, but might be a disaster-class move for you, so be careful here.
Step 3: Find the local game files
Through the Steam gear icon menu for the game, in the Manage tab, you can choose Browse local files to find the game file location, which we'll need for the mod installation. On your average Linux installation, this will most likely be in ~/.local/share/Steam/steamapps/common/Fallout\ New\ Vegas/. For now, just find and take note of this location, maybe even make an alias for it in your .bashrc, and we'll get right back here after a few rounds of account setups and downloads.
Step 4: Downloading the patcher
Time to download the specialized tools needed for patching 'Fallout: New Vegas'. Just like in the official guide from Jakey himself, you'll need a NexusMods account, and if you want to save yourself a lot of toil, it's recommended to sign up for the free premium account trial - neither shilling nor promoting here, just letting you know that the rest of this process will be a lot more pleasant with the premium account.
With your Nexus account ready to go, swing by https://www.nexusmods.com/api/files/559345823580/download, to trigger the download of the patcher.
Once you have it downloaded, unpack it, and copy the FNVpatch.exe file into your local game files, as discovered in step 3.
Step 5: Running the patcher
Since the patcher is a .exe file, we'll need to work a bit of Proton magic to execute it, by virtue of protontricks. In your local game directory, go ahead and run:
protontricks-launch --cwd-app --appid 22380 ./FNVpatch.exe
You should end up with output looking somewhat like this:
protontricks (WARNING): Current Steam Runtime not recognized by Protontricks.
pressure-vessel-wrap[34397]: W: Not sharing path --filesystem="/etc" with container because "/etc" is reserved by the container framework
pressure-vessel-wrap[34397]: W: Not sharing path --filesystem="/sbin" with container because "/sbin" is reserved by the container framework
ntsync: up and running.
Patching FalloutNV.exe [US]...
FalloutNV.exe patched!
Press any key to continue...
Note that the "Press any key to continue" portion might not work, but you can just ctrl+c your way out of there at that point.
Note: If you ever run Steam's "Verify integrity of game files" command, this will undo the patching, and you'll have to re-run it.
Step 6: Downloading xNVSE
Fetch xNVSE from GitHub, and unpack it into your game directory:
cd ~/Downloads
wget https://github.com/xNVSE/NVSE/releases/download/6.4.9/nvse_6_4_9.7z && 7z x nvse_6_4_9.7z -onvse && cp -r nvse/* ~/.local/share/Steam/steamapps/common/Fallout\ New\ Vegas/
If your game location differs from the default Steam game file location, make sure to adjust the unpacking location in the above command before running.
Step 7: The DXVK config file
Unlike Windows users following along with the original Jakey guide, you should already have DXVK running on your system, since it's a cornerstone of Steam's Proton framework. However, the setup does still need a DXVK config file, which we'll get by downloading the same archive. Download the DXVK archive from Nexus mods: https://www.nexusmods.com/api/files/559345926172/download
Following that, extract just the config file to your game directory:
cd ~/Downloads && 7z e DXVK*.7z dxvk.conf -o"$HOME/.local/share/Steam/steamapps/common/Fallout New Vegas/"
Most of the configurations in the file are more or less already default from Proton, but there are a couple that are specific to this setup. You can leave everything as default, since the configs overlapping with Proton, or the Windows-specific ones, will simply be ignored by DXVK.
Phase 2: Modding the game
With all of that out of the way, we're now at the slightly less dull part of the process, even if we're still just going to be installing and downloading stuff.
Step 8: Download Jackify
In Jakey's original guide, the mod installation tool was Wabbajack, a Windows-only tool. Luckily, through the beauty of open source software, we do have an alternative, in the form of Jackify, from GitHub user Omni-guides - make sure to support FOSS initiatives like these, by e.g. supporting people like Omni-guides on Ko-fi, if you have the means to do so.
For this purpose, we'll be making a Games directory in your user root - feel free to rename or relocate it to fit your setup. We'll fetch the Jackify AppImage from GitHub, verify that the download hasn't been corrupted against the checksum, and then make it executable:
mkdir -p ~/Games/jackify && cd ~/Games/jackify
wget https://github.com/Omni-guides/Jackify/releases/download/v0.8.1.2/Jackify.AppImage \
    https://github.com/Omni-guides/Jackify/releases/download/v0.8.1.2/SHA256SUMS
sha256sum -c SHA256SUMS && chmod +x Jackify.AppImage
This should hopefully end up with a fair bit of console output, ending with an encouraging:
Jackify.AppImage: OK
Step 9: Download NakeyJakey's Wabbajack file
Download NakeyJakey's Wabbajack file from the NexusMods link in the official guide: https://www.nexusmods.com/api/files/559345930601/download - this for some reason got flagged as a suspicious download by Google Chrome, but you can luckily click your way around that blocking pretty quickly. This is a good time for me to note that you can always double-check the download links in the official guide, if you're worried that I'm trying to pull a fast one on you with this system-config trust exercise we're doing here.
With the downloaded archive in your ~/Downloads folder, go ahead and run:
cd ~/Games/jackify
7z e -so ~/Downloads/NakeyJakey*Wabbajack*.7z '*.wabbajack' > NakeyJakeysNewVegas.wabbajack
This will unpack the wabbajack file into your ~/Games/jackify directory, finishing by renaming it to not have spaces and special characters (just to avoid that class of headaches).
Step 10: Downloading and installing the mods
At last, we're at the step where we gather up the many pieces of the puzzle, and transform our vanilla 'Fallout: New Vegas' Ultimate Edition into NakeyJakey's New Vegas.
First things first, in your ~/Games/ directory, make yourself a couple of new sub-directories:
cd ~/Games/
mkdir NJNV NJNV_downloads
~/Games/NJNV/ will be the installation directory, ~/Games/NJNV_downloads/ will be the download directory.
Now it's time for us to launch Jackify. In your Games/jackify directory, run:
./Jackify.AppImage
This should pop open the Jackify GUI, moving us out of the terminal.
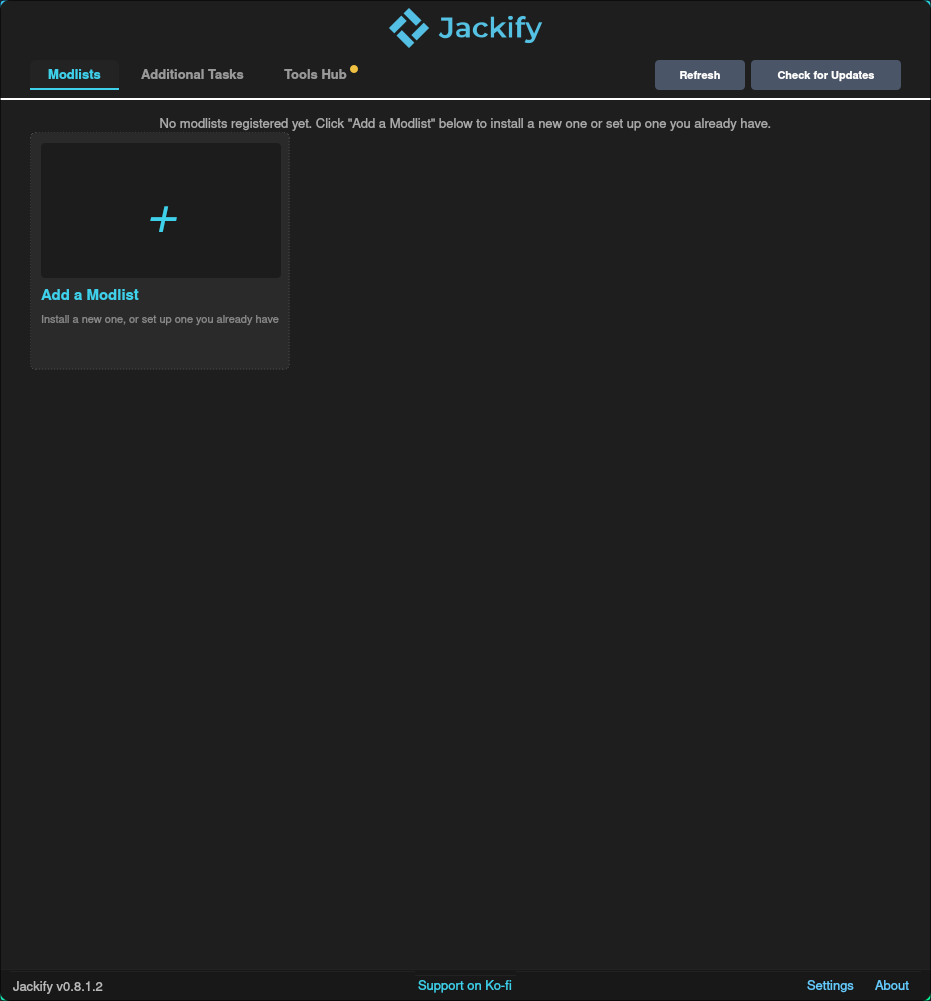
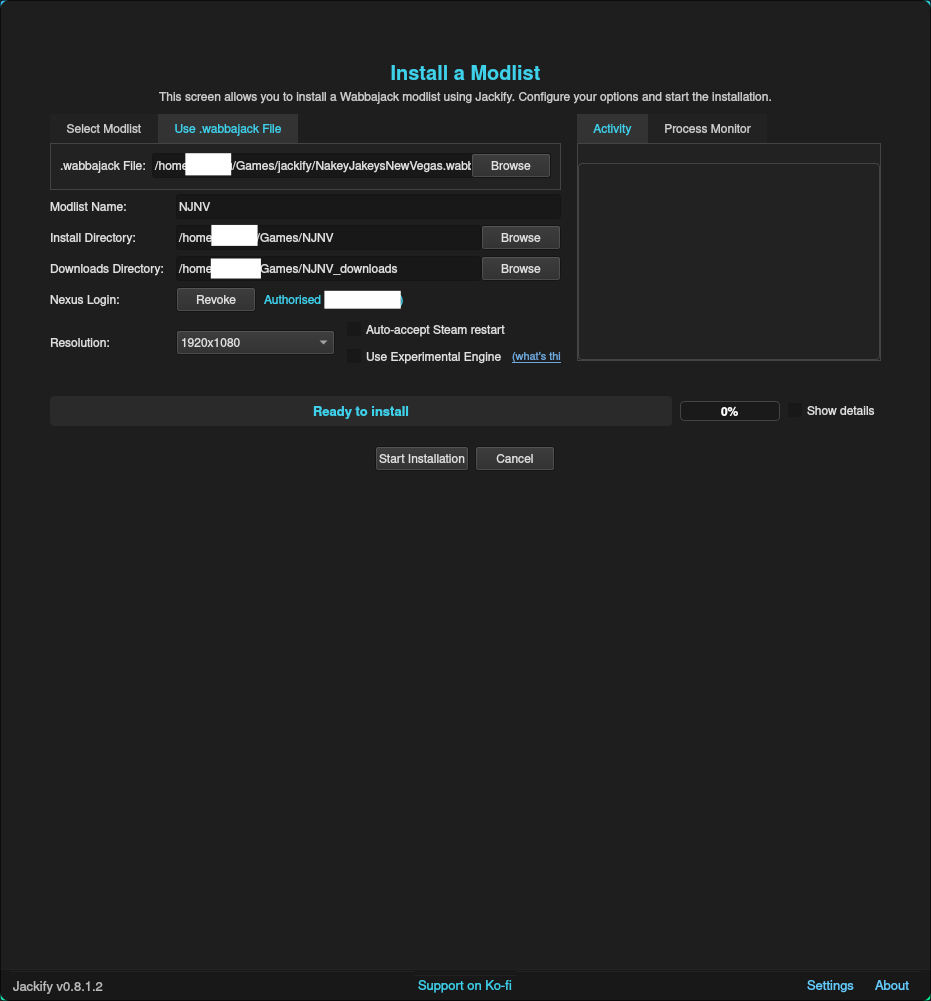
Click Add a Modlist, and then Install a New Modlist. In the subsequent popup, switch to the Use .wabbajack tab, and select the NakeyJakeysNewVegas.wabbajack file that we saved in ~/Games/jackify/NakeyJakeysNewVegas.wabbajack.
Make sure to point the download and install directories to the ones we created earlier in this step, authorize with your NexusMods account, set the modlist name to whichever you prefer (note that this will be the name of the launcher in your Steam library - I'm just opting for "NJNV"), and set your resolution config to match your setup. With all of that done, you'll end up with a configuration window looking roughly like this:
And now, for the moment of truth: Click Start Installation.
This will first run the download step, followed by the installation step. How long this takes will depend a lot on both your internet speed and bandwidth, and on how powerful and busy your CPU happens to be. In my case, I think I got through all of it in around 20 minutes, so not too bad, but your mileage may vary.
After a quick, prompted Steam reboot, you'll end up with the following view:
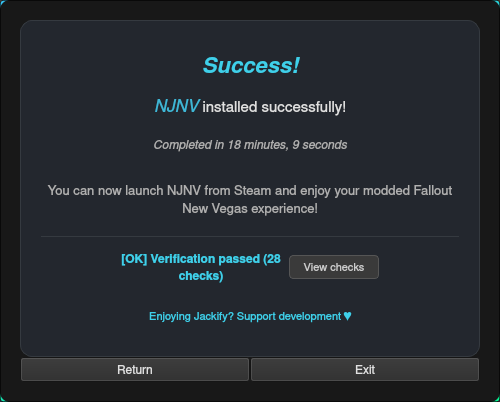
This will create a new entry in your Steam library, matching the name of your selected modlist name.
And just like that, we're very much in the endgame of this entire journey.
Phase 3: Launching NakeyJakey's New Vegas
With all of the setups and modding out of the way, we're now ready to launch our no-longer-vanilla New Vegas experience.
Step 11: Launch configs
In the official NJNV guide, he mentions capping the framerate at 120 fps, to keep the physics stable. On a Windows machine, you can do this through the NVIDIA control panel. However, on Linux you're more likely to get kicked in the balls by NVIDIA than to get any official tooling, so we'll need to bake the framerate cap into our Steam launch command instead.
In the new Steam library shortcut made by Jackify, once again open the Properties… menu. This time around, there will already be pre-populated fields there, handled by Jackify. We don't want to mess too much with those, so we'll just prepend DXVK_FRAME_RATE=120 to the launch command, ensuring a space afterwards to separate it from the existing configs. If you ever find yourself needing to cap the framerate lower, this is where you'll adjust that (I'll probably cap mine at 60, since I fear that my laptop might croak if I don't).
Step 11.1: NVIDIA configs again
As briefly mentioned way back in step 2, if you happen to need to override the launch command to make it pick the right GPU, this will also need to be prepended to your launch configs at this stage. So I'll also be adding __NV_PRIME_RENDER_OFFLOAD=1 __GLX_VENDOR_LIBRARY_NAME=nvidia __VK_LAYER_NV_optimus=NVIDIA_only to mine.
Step 12: First launch
Alright, you should now be all good to go ahead and press PLAY, which should launch Mod Organizer 2 (MO2), rather than the game itself.
It took a little while on the first launch of MO2 for me, but it got there within a minute or so. At this point in Jakey's official guide, he mentions being prompted by two popups: One to "Clear the read-only flag", which the response to is Yes, along with checking the Remember this choice checkbox, the other being about MO not being set up to handle nxm links, which you should also allow. I had neither of these, so I'm just bringing them up in case you do.
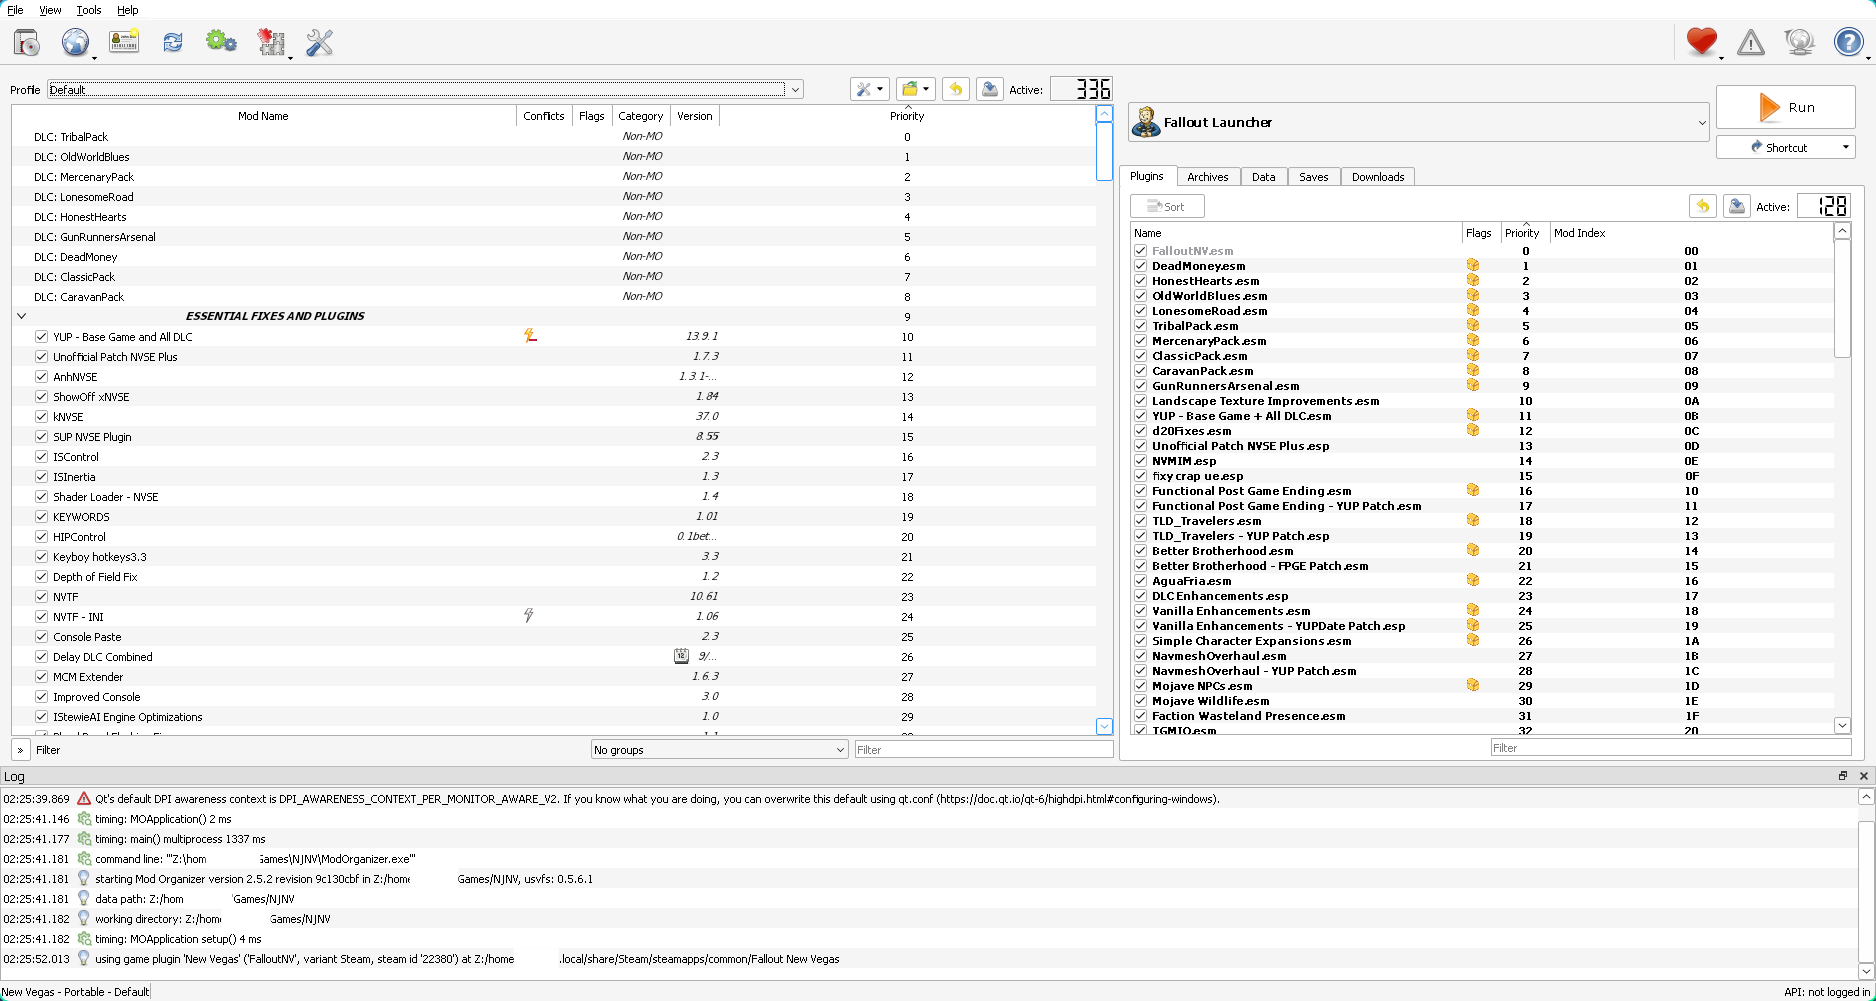
If Fallout Launcher is selected in the top-right drop-down, you should be good to just click the Run button. Note that the Fallout Launcher option is only relevant when you need to tweak settings - we'll switch it out when we want to launch the game properly.
If all goes well, this should bring you full circle, back to the 'Fallout: New Vegas' launcher, where you should now finish the config by clicking Options, and applying the exact instructions from the official guide:
- Don't mess with the Graphics Adapter
- Set your appropriate aspect ratio and resolution
- Antialiasing: 4 Samples, Anisotropic Filtering: max (15 on my machine), HDR: on
- Advanced → Water: Water Displacement off, Full Scene Reflections off
- Advanced → Shadow: Enable Shadows off
Note: While the game is launched, MO2 will have a constantly running popup reminding you that it is in locked mode while a game is launched - do not click the
Unlockbutton, since this will break your install.
Alright, all of the options set - close the launcher again. As briefly mentioned, when you want to configure the game's options, the Fallout Launcher option in MO2 is what you're after. But for actually launching the game, you need to open the dropdown, and instead choose NVSE. Once that's selected, press Run once again.
This will take a while, and might even crash a couple of times - all matching the original guide, and expected experience. Luckily, it's only this initial launch having this issue, so just be patient for a second. All your feedback from the system at this point will be a black screen in the game window, so everything is good if that's what you're looking at.
And finally, if everything plays ball, you should be greeted by new, high-resolution splash screens, indicating that your mods have loaded correctly. You made it through!
Conclusion
And that, at long last, is it! NakeyJakey's New Vegas, running on your Linux machine. I hope this guide was able to get you at a bare minimum most of the way there, and that any emerging issues that I didn't encounter were peaceful enough to work around.
I'd like to quickly thank the man NakeyJakey himself for putting this mod list together, even including some NakeyJakey-and-his-Xbox-brother originals in there - it was exactly the sort of "excuse" I needed to pick up this classic, and I'm excited to get into it. Also, a huge thank you to anyone contributing to open source, be it game modders or tool maintainers like Omni-guides. This guide is pretty much just chaining together the incredibly hard work of a whole bunch of other people, who all made their hard work available for free, and we're lucky that there's an abundance of people like that out there. That includes the Pip-Boy Tux gracing this post's thumbnail, which is the work of Masaaki-jp.
Support open source if you can, and enjoy NakeyJakey's New Vegas!