2026-08-26
Virtualizing Oxide's Helios and Propolis on Potato Intel Hardware
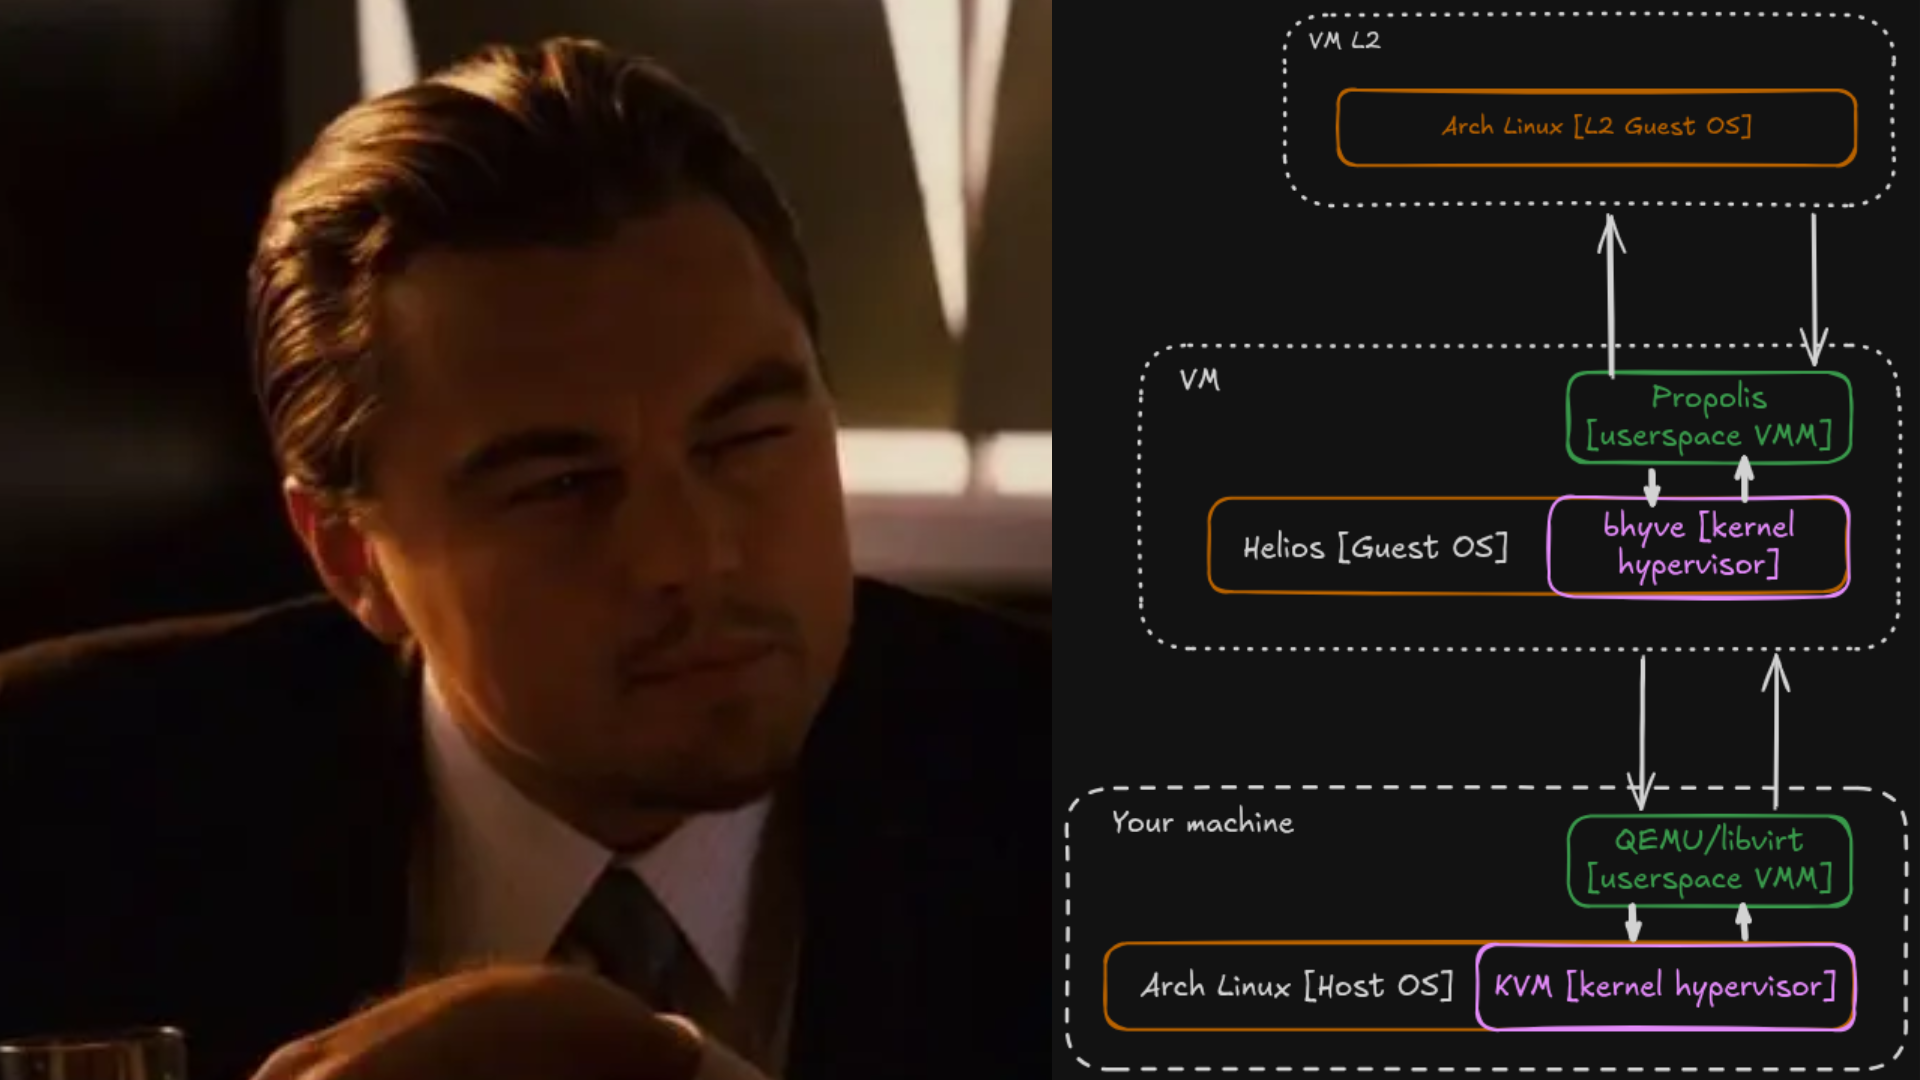
A guide on how to virtualize Oxide Computer Company's Helios operating system, and on setting up a nested VMM with Oxide's Propolis, on a Linux machine with an Intel CPU.
I've spent my entire career as a software engineer wrestling and wrangling the products and offerings of pretty much every hyperscaler cloud provider under the sun, including of course their various container orchestration tools. Naturally, as cost-per-user became increasingly important to Tryp.com, that would lead me down a path to prioritising cheaper VPS providers, deepening my appreciation for more self-managed hardware, and for the many FOSS container orchestration tools out there.
Concurrently with this journey of more hardware control and the significant cost savings often associated with it, I started seeing more and more posts on social media, about companies opting to own their own hardware, and the absolutely wild savings they were seeing. Notably, 37signals were very vocal about their cloud exit, and the many advantages from that move (including the copious amounts of cash saved). Obviously, these companies were and are operating at very different scales to us, but the point still stuck with me, as well as the temptation of the engineering undertaking a self-owned and managed hardware stack would be.
So when Oxide Computer Company's CTO and co-founder Bryan Cantrill appeared on my favorite engineering podcast; The Pragmatic Engineer (The history of servers, the cloud, and what's next with Oxide), I was immediately enchanted by the company's product and mission: A re-imagining of what compute ownership could look like, as well as re-defining how the rack itself could be constructed - all the way from the grittiest hardware details, to the most elegant, high-level software details. All while open sourcing most of the software and the knowledge? They were tailor-made to make a fan out of me.
Since then, I've been an avid follower of Oxide's work, and the more I heard about the various system components, the more I wanted to try running some of it on my local machine. And that more or less brings this annoying internet-recipe-blog-style-introduction to its conclusion, and brings us to the challenge at hand: Oxide's software is tailor-made to run perfectly on their fully in-house, heavily customized server racks. It's also made primarily targeting AMD CPUs, and to run on their in-house operating system Helios. So what options do I have, on my rapidly deteriorating laptop, running Arch Linux, and an Intel CPU?
Well, more options than you might think (or at least than I thought), and this short guide should take you from having plain ol' X86_64 Linux machine, running decidedly no Oxide software, to having a virtual machine running Helios, in which you'll have Oxide's VMM (Virtual Machine Monitor) Propolis running a nested GuestOS in another virtual machine. A matryoshka doll of virtualization is what we're aiming for, and like every good learning journey, it begins with…
Table of Contents
- Phase 1: Getting your Helios VM running
- Phase 2: Nested virtualization through Propolis
- A Conclusion of Sorts
Phase 1: Getting your Helios VM running
Oxide's software is built to run on their own in-house operating system Helios, a distribution of illumos, which itself is a continuation of OpenSolaris, the FOSS version of Solaris, which is an operating system originally made by Sun Microsystems back in the early 90s. Bit of a history lesson there, but it raises the core issue at hand: The "real" rack Helios is very tricky, presumably impossible, to boot on commodity hardware. It's built for the Oxide server racks - so what do we do for local, decidedly not Oxide-server-rack-located development?
Well, we of course reach for a virtual machine - and we're in luck, because Oxide have already open sourced their in-house tool stack for virtualizing Helios, in the form of the helios-engvm repository (https://github.com/oxidecomputer/helios-engvm).
Step 1.1: Download tools and seed image
To get started, let's clone the repository and cd into it:
git clone git@github.com:oxidecomputer/helios-engvm.git && cd helios-engvm
Oxide has already provided a convenient set of scripts to get us started. For a start, we need to download the seed image, containing Helios. Execute the download script:
./download.sh
This should both download the image if you don't have it locally, and unpack it once it has been fetched.
If you end up with output ending with:
seed image downloaded ok
- you're in business!
Step 1.2: Preparing your environment
This is probably a good point to reiterate that I'm going through these steps on an x86_64 Arch Linux machine - the guide will be tailored accordingly, and your mileage may vary especially in terms of installation commands. Adjust as needed to your distribution's package manager and oddities.
Step 1.2.1: Needed packages
To run the Helios VM, you will at least need to install the following packages:
libvirt: A collection of software providing a convenient interfacing mechanism towards multiple hypervisors, like KVM/QEMU, Xen, and VirtualBox. Also containsvirsh, the CLI tool for interacting withlibvirt.qemu: The arguably most widely used VMM (Virtual Machine Monitor) in the market, used to create and manage VMs (Virtual Machines).dnsmasq: Used bylibvirtto set up some networking infrastructure - not explicitly included in thelibvirtinstall on Arch, could be different on your distro.cpio: A file archiving tool, very commonly used to createinitramfsimages, i.e. the initial ramdisk loaded by an operating system.curl+gzipandgunzip: Used by the download script to fetch the OS ISO - so if you didn't have it (which would be unusual, but I'm not here to shame anyone), step 1.1 would already have caused issues - sorry about the late notice.
You may already have some of these installed, or there may be additional packages that your system is missing. Luckily, anything missing will unveil itself pretty quickly, once we try to launch the virtual machine, so bridge any emerging gaps in my package list as needed.
So to get these running on Arch (where packages like curl, both gzip tools, and cpio is already installed), you can most likely settle for:
sudo pacman -Syu qemu-full libvirt dnsmasq
Step 1.2.2: A note about KVM
An important point worth making is that your machine - if on Linux - will need KVM (Kernel-based Virtual Machine) to be enabled, so you can interact with the /dev/kvm device. To make it all the way through the post, where we'll use Propolis to run a GuestOS inside our Helios GuestOS, you also need to have nested virtualization enabled.
Step 1.2.3: Your environment configs, part 1
You'll need to add your user to the libvirt user group, to interact directly with the virtual machines:
sudo usermod -a -G libvirt $(whoami)
For this to take effect, you'll need to log out and back in, or alternatively make a temporary group switch by running (note that this will only apply to the current shell session):
newgrp libvirt
For future you's potential debugging sanity, I would recommend spending the few extra seconds to log out and back in again - not properly finalizing the user group association can lead to some not super transparent bugs later on, if you find yourself launching multiple shell sessions.
Step 1.2.4: The pitfalls that I encountered
When following the README in the helios-engvm repository blindly, I encountered a few hiccups, which I'll just quickly document my fixes for. These aren't in any ways noted as slights against the Oxide documentation on the repo - it does very explicitly state that the guide is written for Ubuntu 24.04.4 LTS, and I'm sure that some of my issues were also just results of odd overlapping configs here and there. Just noting them down to hopefully save other people the same headaches.
libvirt daemons not active
This will cause issues when trying to interact with libvirt in any way, but the first time I bumped into it was when trying to enable the default libvirt network (more on that later). The solution is simply to enable the daemons, in my case using systemctl:
sudo systemctl enable --now virtqemud.socket virtnetworkd.socket virtstoraged.socket \
  virtnodedeviced.socket virtsecretd.socket virtnwfilterd.socket
While this first manifested as a networking issue on my machine, we need all of the above daemons running for libvirt to do its thing.
authorized_keys location
The create.sh lifecycle script of the repo, used to launch the VM, copies your authorized SSH key into the VM, to let you easily SSH into the VM - that's very, very nice, but it also assumes that it can find your SSH public key at the location ~/.ssh/authorized_keys.
If that matches your system layout, you're good to go. If not, you can very quickly solve this by copying your public key into the input directory - run this from your cloned helios-engvm directory:
cp ~/.ssh/yourkeyname.pub input/cpio/authorized_keys
The great qemu:///session vs qemu:///system debacle
This was by far the issue that caused me the most headaches and time spent debugging, since it can be caused by multiple factors, that all ultimately manifest into the error message:
error: Failed to create file '/var/lib/libvirt/images/helios-metadata.cpio': Permission denied
I ended up with a whole chain of mistakes that made this extra hard to sort out, but you should be able to avoid it by doing the following:
Ensure that your user is assigned correctly to the libvirt user group. I mentioned this in step 1.2.3, but there's so much pain to be found from being tripped up by this. I once again recommend just biting the bullet, and signing out and in of your user before proceeding from step 1.2.3, or at least from here.
Set your default libvirt URI to qemu:///system. There's a lot of potential headaches to be saved, by explicitly exporting qemu:///system as your default libvirt URI:
export LIBVIRT_DEFAULT_URI=qemu:///system
I'd even go as far as persisting that line in your .bashrc (or similar) file, to avoid you being tripped up by it changing under your feet. You could also add it to the top of the lifecycle scripts (I opened a PR on the repo suggesting this, to avoid issues from mismatching environment assumptions).
Change default machine type definition
At the time of writing, the create.sh lifecycle script defaults to assuming that your machine type is pc-i440fx-focal. This is very likely to be true if you're on a Ubuntu host, but if you - like me - aren't, then you'll need to update the VM XML config in create.sh to instead have the following <os> block:
<os>
  <type arch="x86_64" machine="pc">hvm</type>
  <boot dev="hd"/>
</os>
Properly configure UFW to allow VM networking
So much time of my life was lost to this one as well. Lots of red herrings in tracking it down, but if you like me have ufw installed on your system, you might need to make some openings in the firewall, to let networking flow properly from the VMs' virtual networks:
sudo ufw allow in on virbr0              # guest → host services (DHCP, DNS on .1)
sudo ufw route allow in on virbr0 out on wlan0 # guest → internet
sudo ufw route allow in on wlan0 out on virbr0 # replies back
If you're running a different firewall software, you may need to make similar adjustments to your firewall rules, to allow the VMs to communicate with the outside world.
Alright, that's almost all of the pitfalls I fell into. Might be due to me being dumb as a bag of hammers, but at least they're now documented for future generations to find.
Moving on to…
Step 1.2.5: Your environment configs, part 2
Alright, with all of the potential shenanigans more or less out of the way, let's get the last few pieces of the puzzle in place.
You'll need to first check if the default libvirt network is activated:
sudo virsh net-list --all
You should get output looking roughly like so:
Name         State Autostart Persistent
--------------------------------------------
 default active no                yes
If not, you'll need to explicitly activate it:
sudo virsh net-start default
And that should hopefully sort it out.
Step 1.3: Launching your first Helios VM
So far so good: Your environment has been configured, and your ass has been largely covered as far as the common pitfalls go. Now we can get to actually launching a VM.
If you want to configure the VM size and allocations, you can either copy the configuration in config/defaults.sh into a new file, modify it, and pass it as an argument to create.sh, or you can edit the defaults.sh file directly and just have create.sh pick up the modified defaults - noting of course that such an approach slightly throws the point of a "default" out of the window. I'll be running the defaults as-is, with no modifications.
To launch a VM, simply run:
./create.sh
Upon initial creation, this will take a little while, around 1-2 minutes on my potato.
But after a bit of waiting, you should be greeted by the illumos splash screen - glorious stuff, so far so good.
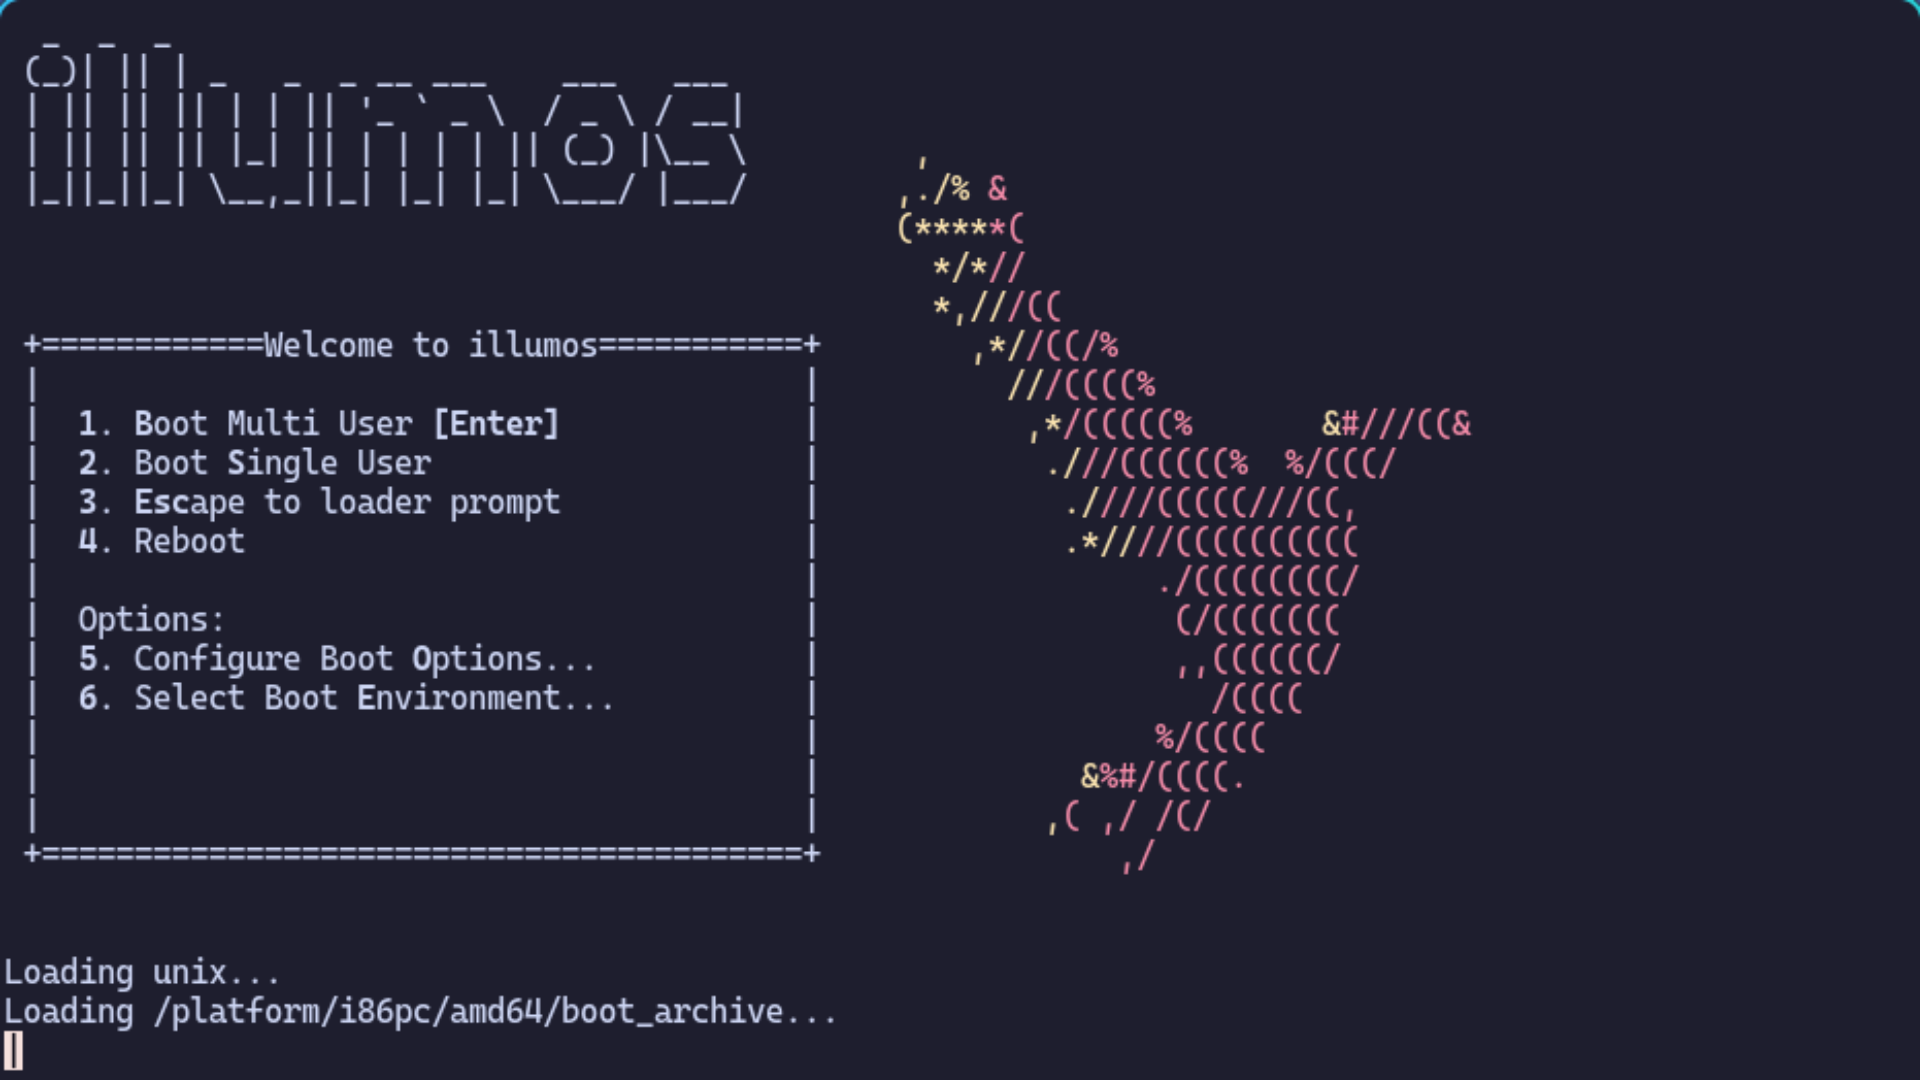
What you should also most likely be facing, is a crash-loop upon booting Helios, with the following output:
Loading unix...
Loading /platform/i86pc/amd64/boot_archive...
Loading /platform/i86pc/amd64/boot_archive.hash...
Booting...
Oxide Helios Version helios-3.0.23976 64-bit

panic[cpu0]/thread=fffffffffbcaa360: BAD TRAP: type=e (#pf Page fault) rp=fffffffffbcafff0
addr=fffffe0340807370

#pf Page fault
Bad kernel fault at addr=0xfffffe0340807370
pid=0, pc=0xfffffffffb87b51a, sp=0xfffffffffbcb00e8, eflags=0x10007
cr0: 80050011<pg,wp,et,pe> cr4: 3000b8<smap,smep,pge,pae,pse,de>
cr2: fffffe0340807370 cr3: a000000 cr8: 0

     rdi: fffffe0385ddb000 rsi: fffffe0340807370 rdx:           2d617274
     rcx:         5ac2e4e r8: fffffe03b33f3000 r9: fffffe03b33f3000
     rax: fffffe0385ddb000 rbx:          2d617274 rbp: fffffffffbcb0170
     r10:           1f2 r11:          1f2 r12:              0
     r13: fffffe0384899740 r14:           2d617274 r15: fffffe0340807370
     fsb:        200000000 gsb: fffffffffbc3f000 ds:             0
      es:            0 fs:            0 gs:               0
     trp:            e err:           9 rip: fffffffffb87b51a
      cs:           30 rfl:        10007 rsp: fffffffffbcb00e8
      ss:           38

Warning - stack not written to the dump buffer
fffffffffbcaff00 unix:die+d3 ()
fffffffffbcaffe0 unix:trap+999 ()
fffffffffbcafff0 unix:cmntrap+e9 ()
fffffffffbcb0170 unix:bcopy+55a ()
fffffffffbcb0200 unix:startup_modules+10a ()
fffffffffbcb0210 unix:startup+5a ()
fffffffffbcb0250 genunix:main+36 ()
fffffffffbcb0260 unix:_locore_start+88 ()

skipping system dump - no dump device configured
rebooting...
/boot/config: -h
Not pretty, and caused by an upstream illumos bug. Luckily, it is pretty easily fixable:
- While in the initial loading screen, press
esc. This should give you a prompt simply readingok - In that prompt, enter:
set smbios-address=0x340800000 - Follow that with:
boot
This will once again give you a decent amount of output, as Helios prepares to boot. It should, if everything went well, end up with you getting the output:
You should be able to SSH to your VM:

      ssh <your-user>@<your-ip>
Note: If something goes wrong, and you need to debug the system, you can simply press enter here, and sign in as root with an empty password.
Run the provided ssh command in a new shell session, and voila! You should be signed into your very own user, on your very own Helios VM, being greeted by the output:
The illumos Project helios-3.0.23976         May 2026
<your-user>@helios:~$
A great checkpoint to have reached - Helios, but on decidedly non-Oxide and non-AMD hardware. Try poking around a bit if you're feeling curious, or otherwise proceed to the next step.
Phase 2: Nested virtualization through Propolis
Phase 2 has arrived, and only countless steps after phase 1 - we love a good sub-step in this house.
For step 2, we'll be setting up our VM so that we can hopefully achieve nested virtualization, through Propolis, the in-house VMM from Oxide. Note that all instructions in this phase are expected to be run within the Helios VM, unless otherwise explicitly stated.
Step 2.1: Update packages
First things first, let's get our packages on the VM up to speed. On illumos distributions, this is done with the pkg tool, which we want to run with elevated privileges by running it through pfexec:
pfexec pkg update
Depending on the speed of your internet and your proximity to the package repositories, this might take a little while. Nothing to do but patiently wait it out.
Step 2.2: The Rust toolchain
Propolis is written in Rust, and as such, we'll need Rust installed to build it from its source code.
To install the Rust toolchain, simply run:
curl https://sh.rustup.rs -sSf | sh
. "$HOME/.cargo/env"
You'll be prompted for whether you want to configure the installation, or go with the defaults - opting for the defaults has given me no issues so far.
And once again, we find ourselves needing to wait out an installation flow - sorry, but luckily it is all just a one-time setup thing.
Once it finishes installing, you can verify that it succeeded by running:
~# rustc --version
rustc 1.98.0 (88d9e12ae 2026-08-18)
Step 2.3: Installing Propolis
Now that we have our Rust toolchain up and running, we can move on to installing Propolis from source.
Barring any grim surprises from the universe, you should be able to sort that out by cloning the repository, and using cargo to run the installation process:
cd ~
git clone https://github.com/oxidecomputer/propolis
cd propolis
cargo build --release --bin propolis-standalone
You'll notice that we're building the standalone version of Propolis, rather than the fully fledged propolis-server. This is purely for the sake of simplicity, and since it scratches all our needs in terms of this exercise - if you feel tempted to try running Propolis with the full HTTP server available, absolutely go for it. In that case however, the mileage you'll get out of this little walkthrough, may vary very aggressively from this point forward.
Now we reach most likely the biggest wait of them all. Rust is great, and I've always had a lot of fun writing it, and largely find the tradeoffs made in the design of the language to be really pleasant. But compiling a big-ass Rust codebase can be a bit of a drag, especially on not super bleeding-edge hardware - this is further multiplied by the limited resources we made available to our VM. So for this one, I wouldn't even sit back and wait, straight up go do something else, and let the Rust compiler work its magic in peace.
Once the build finishes, your ~/propolis/target/release/ directory should contain an executable named propolis-standalone. Just like that, we're reaching the end-game: Propolis is ready to roll, so let's get a nested VM up and running, this time with Propolis as our VMM.
Step 2.4: Preparing our nested VM
To launch a VM, standalone Propolis needs us to prepare a few things:
- A bootrom
- A guest image
- A VNIC
- A VM config file
Step 2.4.1: Fetching our bootrom
In order for our VM to boot, we need a bootrom, specifically OVMF (Open Virtual Machine Firmware - a FOSS implementation of UEFI). The bootrom takes over the role normally handled by the motherboard's firmware (typically UEFI): handling hardware initialization before the OS launches, finding a bootable disk, and ending with it handing over control to the OS's bootloader.
On real hardware, this firmware is baked into a chip on the motherboard, but since we're executing in a virtualized environment, we need to supply this to the VMM.
Some VMMs, like qemu, ship with a default firmware bundled, which is why you may never have needed to think about supplying a bootrom before. Propolis does not, but luckily Oxide has a pinned OVMF build available for downloading. In your root directory on your Helios guest, just run the following command:
curl -L -o ~/OVMF_CODE.fd \
https://buildomat.eng.oxide.computer/public/file/oxidecomputer/edk2/image_debug/bf64f45b1a58e69d126a3c6ca1e4512c88668132/OVMF_CODE.fd
Once that's downloaded, you're good to go in terms of the OVMF.
Step 2.4.2: Fetching our guest ISO
Because I don't mind our end-product being an affront to God, I'll be fetching an Arch Linux ISO for us to boot - so we're targeting Arch Linux hosting Helios hosting Arch Linux. However, if you'd like things to wrap up just a smidge faster, you could opt for an even lighter distribution, like Alpine. It doesn't change that much in terms of the steps we'll be taking, you'll just have to be vigilant about changing config file references, and you may end up not needing some of the workarounds that I'll introduce later.
Step 2.4.3: Creating our VNIC
For our VM to be able to connect to our network, it is going to need a Virtual Network Interface Card. The VNIC provides our virtualised guest OS with a network card, which sits on top of the "actual" NIC (in our case also virtualized, due to our nested virtualization project). This creates quite the network packet journey from our nested guest OS to the real internet, which will be going through the VNIC, the Helios NIC, the QEMU virtualized network, and from there through our actual host OS's network stack - there's a few other things going on in that chain, just thought I'd provide an abridged view of the long networking journey ahead for our nested VM.
The tool for managing all data linking in illumos is called dladm, and that's what we'll use to set up a VNIC for Propolis to use - first, let's get the name of our Helios VM's NIC:
~ # dladm show-link
LINK       CLASS MTU STATE BRIDGE OVER
vioif0    phys     1500 up      --      --
Barring any odd surprises, your NIC will probably also be named vioif0 - if not, no worries, as long as it's up and belonging to the phys class, you should be in business.
To then create the VNIC, we need to elevate our privileges with pfexec, and once again use dladm:
pfexec dladm create-vnic -t -l vioif0 -m 02:08:20:ac:e9:16 vnic_prop0
If your NIC link's name differs from mine, replace vioif0 with the correct link name.
And that should be our network setup sorted - now let's tie it all together.
Step 2.4.4: Configuring our VM
Standalone Propolis receives its VM configs in the form of TOML files. Add the following content to a new file, called arch.toml:
[main]
name = "arch"
cpus = 2
bootrom = "/home/<your-username>/OVMF_CODE.fd"
memory = 1024

[block_dev.arch_iso]
type = "file"
path = "/home/<your-username>/archlinux-2026.08.01-x86_64.iso"
[dev.block0]
driver = "pci-virtio-block"
block_dev = "arch_iso"
pci-path = "0.4.0"

[dev.net0]
driver = "pci-virtio-viona"
vnic = "vnic_prop0"
pci-path = "0.5.0"
Make sure to input your user name in the file paths, and to double check that the OVMF and ISO file references match the placement and naming of yours.
With all of this setup out of the way, we're finally ready to take Propolis for a proper spin.
Step 2.5: Launching our Arch Linux VM
From your ~ directory, go ahead and execute our previously built propolis-standalone binary:
~ # pfexec ./propolis/target/release/propolis-standalone ~/arch.toml
Aug 26 02:16:17.366 INFO Creating VM with 2 vCPUs, 1073741824 lowmem, 0 highmem
Aug 26 02:16:17.593 INFO VM created, name: arch
Aug 26 02:16:17.609 INFO Generating E820 map for guest address space
Aug 26 02:16:17.609 INFO Generating ACPI tables with variant V0
Aug 26 02:16:17.612 INFO Waiting for a connection to ttya
If you're greeted with the above output, you're almost there! Propolis is running the VM, and exposing a Unix socket for you to attach to, named ttya (illumos naming convention).
Step 2.6: Connecting to our Arch Linux VM
Fire up another shell on your host machine, then ssh back into your Helios VM like before - if you've lost track of the IP in all of the shenaniganery since then, you can find it quickly by running the following command in your Helios VM:
ipadm show-addr
Find the IP address associated with our NIC (remember the name we noted previously when creating the VNIC), and that should be where you from your own machine can ssh into your user.
Once you've successfully ssh'd into your Helios VM in a new shell session, it's time to attach to the Unix socket exposed by Propolis, using socat:
socat -,raw,echo=0,escape=0x0f UNIX-CONNECT:$HOME/ttya
If absolutely nothing has gone awry so far, you should be greeted with Arch's systemd-boot screen, which means we're 99% of the way there!
However, there's a few small adjustments for us to make in this screen, to save us some trouble (and to get Arch to actually boot).
Step 2.7: Configuring the Arch booting
I will be slightly glossing over the fine-grained details of why we make these changes, but for anyone curious about the inner workings of virtualization, especially the issue we're "solving" with the mitigations=off config does touch on some interesting challenges within virtualization.
If you were to press "enter" and try to boot Arch right away at this stage, you'd be greeted with a neverending wall of:
ERRO Unhandled wrmsr 0x000048 <- 0x000001, rip: 18446744072182825231
ERRO Unhandled wrmsr 0x000048 <- 0x000000, rip: 18446744072182830856
- or similar. This is a result of our VMM not emulating
0x48, which is the Spectre/IBRS speculation-control register. Neitherbhyve(The illumos kernel-level hypervisor) nor Propolis emulates this register, leading to these errors. The register was introduced to prevent the infamous Spectre vulnerability, which leverages speculative execution to get the system to leak confidential information.
If you end up with this wall of output, don't panic - just switch off the Arch Linux VM in your Helios VM (ctrl+c), and run the launch + socket attachment flow again.
Now, once you're greeted with the systemd-boot screen once again, press e. This will open a prompt, where you can edit the boot configuration. Move your cursor to the end of all the existing entries, and append "mitigations=off console=ttyS0,115200" - remember to separate it from the existing configs with a space.
mitigations=off turns off the Spectre mitigation, solving the wall of unhandled 0x48 writes. The console=ttyS0,115200 addition makes sure that Arch attaches to ttyS0, so we can actually see the output from the OS.
Press enter, and your Arch boot should launch.
After a few initialization steps, Arch should prompt you for a login - simply enter root:
archiso login: root
And that is it. If you're feeling so inclined, you can go ahead with the joyous process of finishing an Arch Linux installation, but our learning journey ends here. To validate that you indeed have a functioning Arch Linux guest OS running, take uname -a for a spin:
~ # uname -a
Linux archiso 7.1.5-arch1-2 #1 SMP PREEMPT_DYNAMIC Tue, 28 Jul 2026 13:49:51
+0000 x86_64 GNU/Linux
Arch Linux confirmed running, in our Propolis-managed VM, running on our Helios VM - at last, we can wrap up.
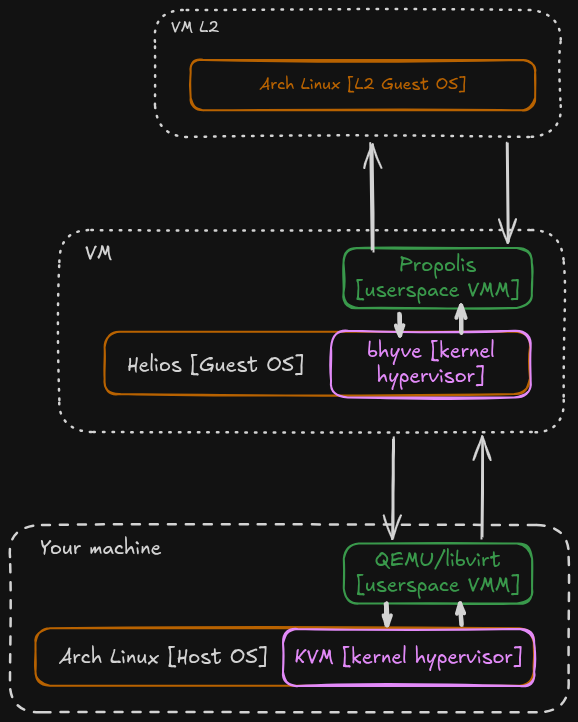
The figure below shows how our final "matryoshka doll" of virtualization fits together, just to give a big picture overview of what our many different shell sessions ultimately boil down to.
A Conclusion of Sorts
And that takes us fully from non-Oxide-rack, non-AMD machine, to running Oxide's Helios and Propolis, even with a touch of nested virtualization. As simple as that.
So what now? Well, you could play around with Helios some more, and try running more of the Oxide software stack. You can play around with Propolis further, and even try messing with the source code - one of the main beauties of open source software, is that you're pretty much given the perfect playground for learning in the form of the source code. And when running in a VM, you really can just fuck around and find out as you please. Just stay very mindful of which layer in our ungodly virtualization matryoshka doll you find yourself in, before executing anything too potentially destructive.
Or: you can just call it a day, and celebrate having made it this far. That's what I'll be doing for now at least - thanks for following the walkthrough all the way until the end, hope it had at least some sort of value!